I have been working with SQL CLR functions and procedures recently, and have come up with a crazy solution involving JSON, Analysis Services, and Visual Studio Database Projects. However, Before we get into the crazy solutions, we are going to take a look at a simple SQL CLR implementation. This simple implementation will include procedures and functions that return formatted dates. Using a simple solution will help with the intricacies of Visual Studio projects, CLR security, project deployment, and CLR execution. In this blog post we will take a look at creating SQL CLR functions in Visual Studio 2019. We will return data as a message as well as a dataset to the results window. We will implement proper SQL CLR security with asymmetric keys and signed assemblies.
The idea behind this blog post is to enhance the current CONVERT function that accepts formats for dates. There are plenty of predefined formats, however this SQL CLR function will allow you to build any date format that C#.net allows, here is a reference for building custom date formats. We will build three different SQL CLR objects, two procedure and one function.
CLR Object List
DateFormatMessage will accept a timestamp and a format, and will return the formatted date to the Message window.
DateFormatResult will accept a timestamp and a format, and will return the formatted date to the Result window.
DateFormatFunction will accept a timestamp and a format, and will return the formatted date as a result from a function call within a query call.
Project Setup
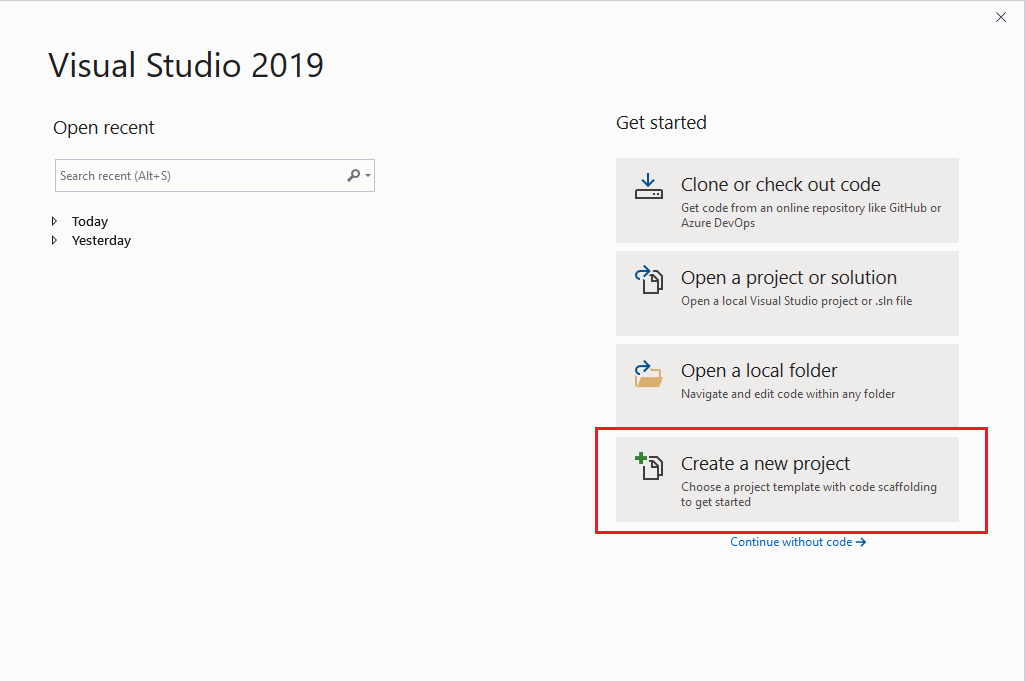
We will create our SQL CLR objects by creating a database project within Visual Studio 2019. After opening Visual Studio 2019 we will select the “Create a new Project” option
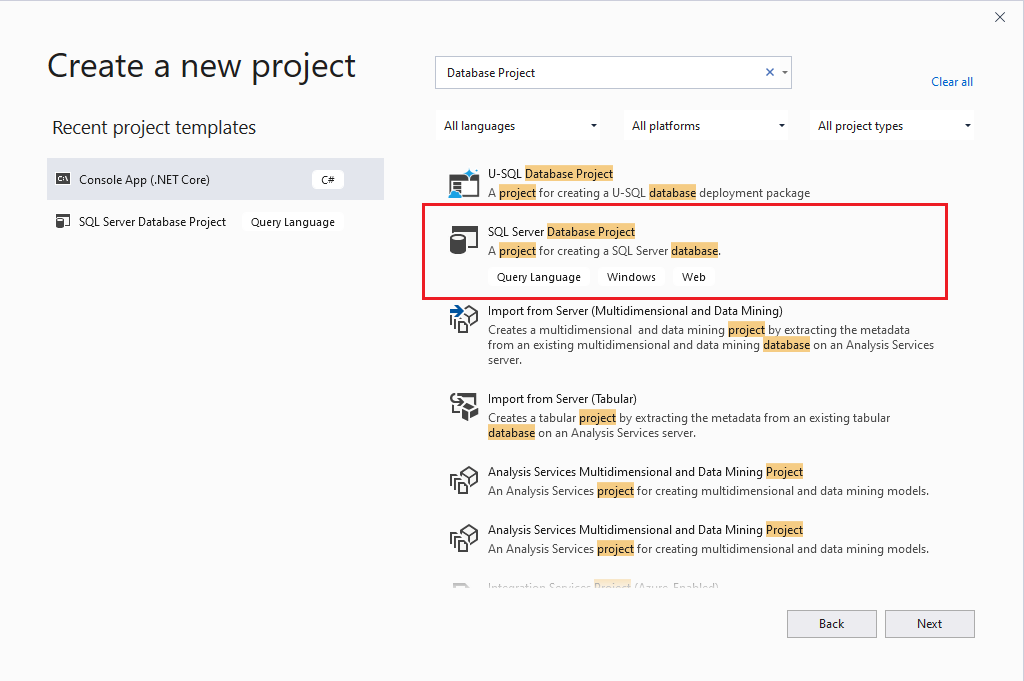
In the “Create new project” window we will select the “SQL Server Database Project” type. We can either scroll through all of the project types or you can do a key word search for the type.
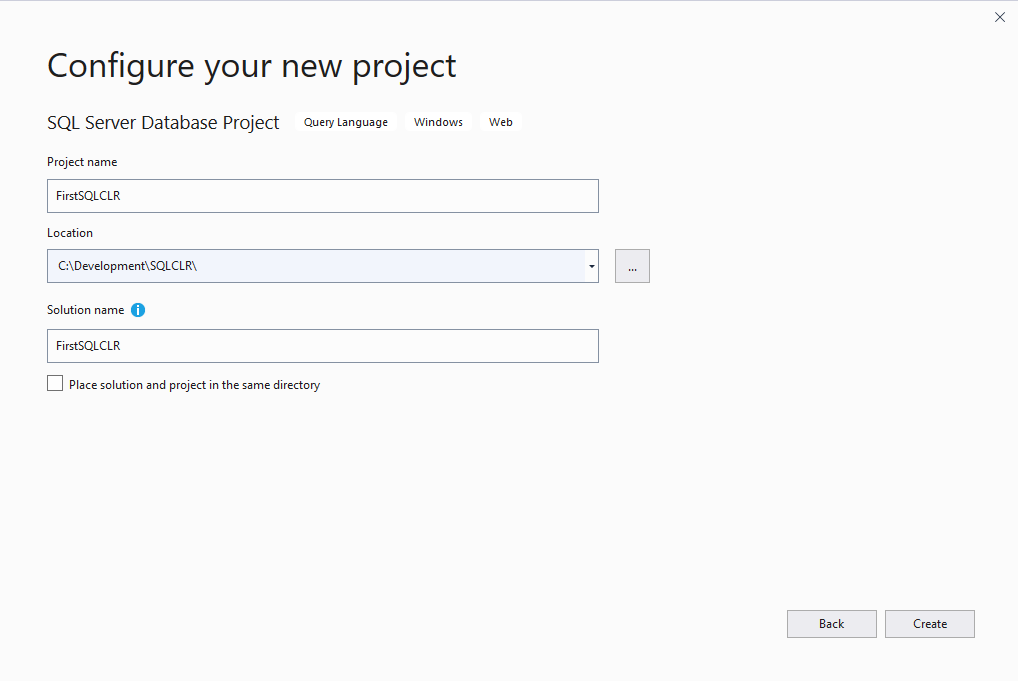
In the “Configure your new project” window we are going to name our project “FirstSQLCLR”, specify the location where our source code will be stored on disk, and leave the solution name the same as the project.
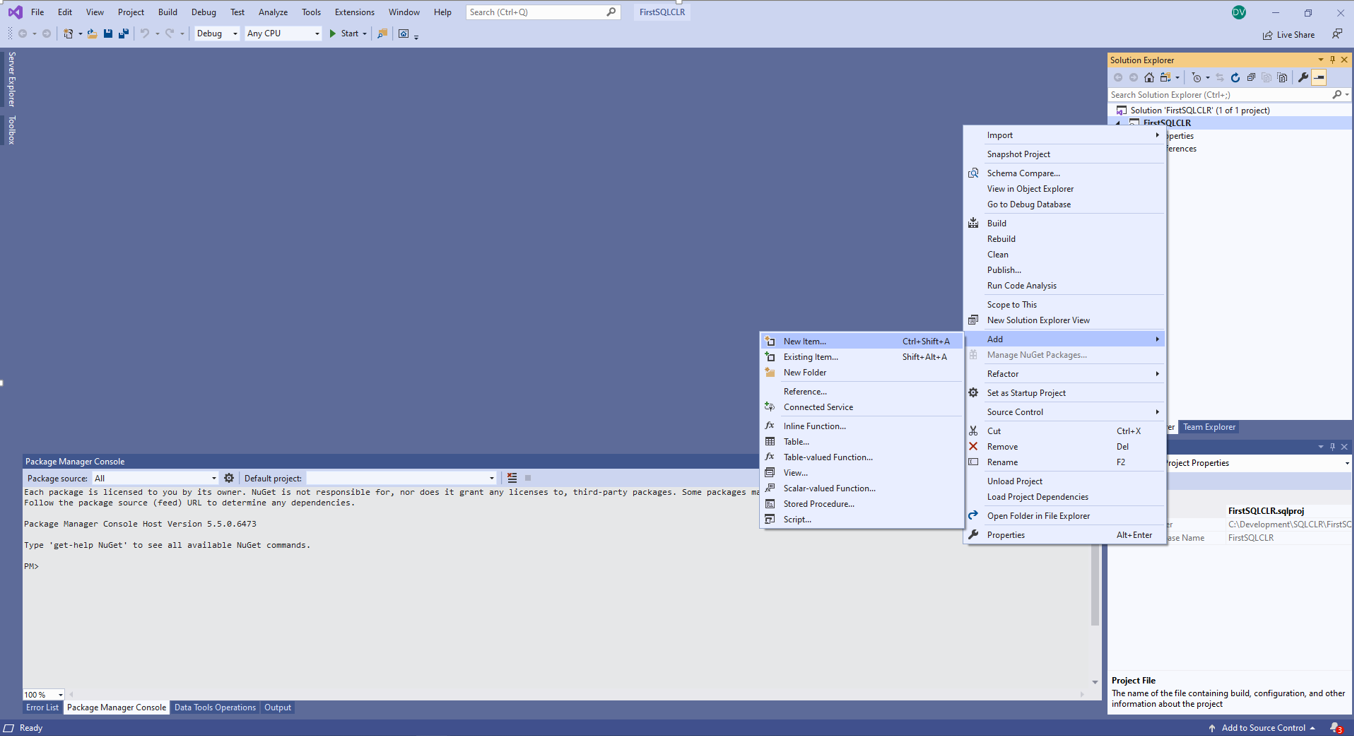
Once Visual Studio finishes configuring the SQL Server Database Project type, we will have an empty database project. There are a couple ways to add the SQL CLR object to the project, we are going to use the Solution Explorer route. In the Solution Explorer windows we will right click on the “FirstSQLCLR” project and select the “Add” option, then the “New Item…” option.
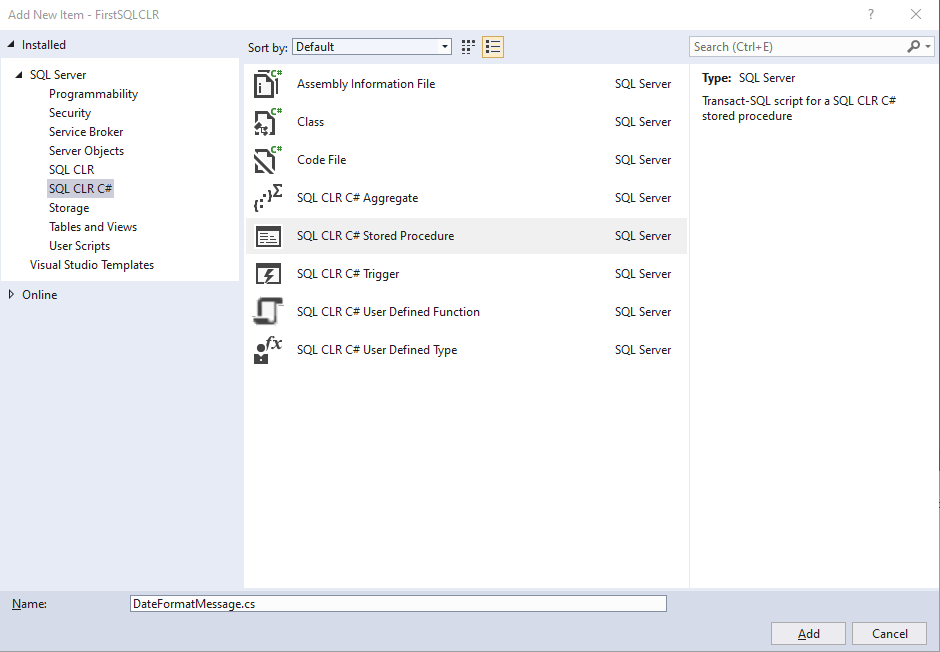
In the Add New Item window we will select the “SQL CLR C#” option in the left options list. In the center window we will select the “SQL CLR C# Stored Procedure” option, and name it “DateForamtMessage.cs”.
In the DateFormatMessage.cs code window we will have an empty C# method body similar to the following code snippet.
using System; using System.Data; using System.Data.SqlClient; using System.Data.SqlTypes; using Microsoft.SqlServer.Server; public partial class StoredProcedures { [Microsoft.SqlServer.Server.SqlProcedure] public static void DateFormatMessage () { // Put your code here } } |
DateFormatMessage
In the DateFormatMessage method we will add code to send data back to the caller using a SQLPipe object, and code to format the passed in date with the passed in format. One thing to note here is that we are passing a string value back to the SqlPipe object, which will be returned to the message window in management studio.
Here is the completed code.
using System; using System.Data; using System.Data.SqlClient; using System.Data.SqlTypes; using Microsoft.SqlServer.Server; public partial class StoredProcedures { [Microsoft.SqlServer.Server.SqlProcedure] public static void DateFormatMessage(SqlDateTime sqlDateTime, SqlString CSharpDateFormat) { SqlPipe sqlPipe = SqlContext.Pipe; DateTime dateTime = (DateTime)sqlDateTime; // Apply the date format to the ToString() function string formattedDate = dateTime.ToString(CSharpDateFormat.ToString()); // send the results back sqlPipe.Send(formattedDate); } } |
DateFormatResult
We will repeat the previous steps for the DateFormatResult.cs SQL CLR procedure, however the code will be slightly modified from the message version. The additional code will allow us to return a record set instead of a single string. The following lines will define a record set object and populate the single value in the object.
// using a meta data object, setup the resultset configuration SqlMetaData sqlMetaData = new SqlMetaData("formattedDate", SqlDbType.NVarChar, 25); SqlDataRecord sqlDataRecord = new SqlDataRecord(sqlMetaData); // store the data into the dataset sqlDataRecord.SetString(0, formattedDate); |
Here is the completed code.
using System; using System.Data; using System.Data.SqlClient; using System.Data.SqlTypes; using Microsoft.SqlServer.Server; public partial class StoredProcedures { [Microsoft.SqlServer.Server.SqlProcedure] public static void DateFormatResult(SqlDateTime sqlDateTime, SqlString CSharpDateFormat) { SqlPipe sqlPipe = SqlContext.Pipe; DateTime dateTime = (DateTime)sqlDateTime; // Apply the date format to the ToString() function string formattedDate = dateTime.ToString(CSharpDateFormat.ToString()); // using a meta data object, setup the resultset configuration SqlMetaData sqlMetaData = new SqlMetaData("formattedDate", SqlDbType.NVarChar, 25); SqlDataRecord sqlDataRecord = new SqlDataRecord(sqlMetaData); // store the data into the dataset sqlDataRecord.SetString(0, formattedDate); // send the results back sqlPipe.Send(sqlDataRecord); } } |
DateFormatFunction
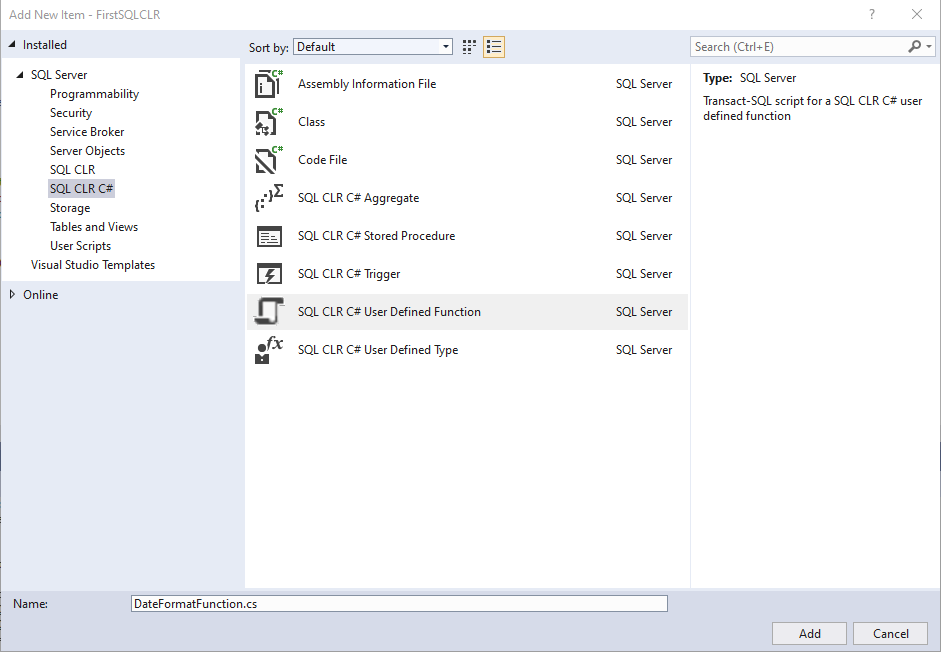
To add the DateFormatFunction we will repeat most of the same steps, however we will need to choose a “SQL CLR C# User Defined Function” instead of the “SQL CLR C# Stored Procedure” option in the Add New Item window.
The code for a user defined function is simplified, as we will not need a SqlPipe to return the results. We are also only returning a single string value, so we will not need the record set object either. Being we are returning a single value from the function, we only need to return the formatted string.
Here is the completed code.
using System.Data.SqlClient; using System.Data.SqlTypes; using Microsoft.SqlServer.Server; public partial class UserDefinedFunctions { [Microsoft.SqlServer.Server.SqlFunction] public static SqlString DateFormatFunction(SqlDateTime sqlDateTime, SqlString CSharpDateFormat) { DateTime dateTime = (DateTime)sqlDateTime; // Apply the date format to the ToString() function string formattedDate = dateTime.ToString(CSharpDateFormat.ToString()); // return the formatted string return new SqlString(formattedDate); } } |
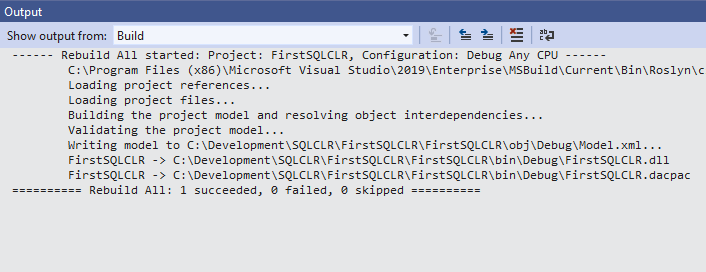
We are ready to try to compile our code. Again there are multiple ways to compile our code, we will use the Solution Explorer route. In the Solution Explorer windows we will right click on the “FirstSQLCLR” project and select the “Rebuild” option.
 |
Providing everything was typed in correctly and we have no build errors we should see that the build succeeded in the output window.
 |
SQL CLR Security
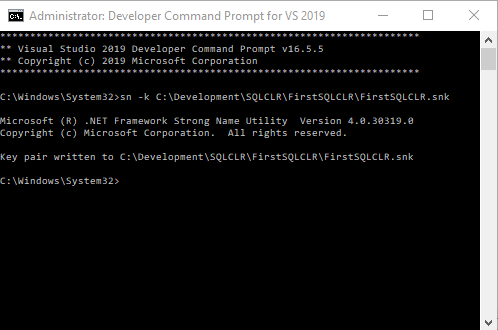
Before we deploy the SQL CLR objects we need to implement the security features needed to allow custom code to run within SQL Server. There are a couple ways to do this, however, we are only going to focus on a secure option implementing asymmetric keys. We will not set the database’s TRUSTWORTHY option on ON, nor will we update the CLR Strict Security option. Here are the steps for creating an asymmetric key, signing the CLR project, and creating a login that binds the asymmetric key and allows the CLR objects to execute.
- Create an asymmetric key using the strong name utility command line tool installed with Visual Studio 2019.
- Create an ASYMMETRIC KEY in SQL Server
- Create a SQL Login based on the ASYMMETRIC KEY
- Grant Permissions to Assemblies using the SQL Login
- Sign the SQL CLR Project with the asymmetric key
Step 1: Create the Asymmetric Key
Sn.exe is a free utility shipped with Visual Studio that will create asymmetric key. We will need to open the command window with Administrator privileges to generate the key. We will run this command with just the –k switch and a path to store the key.
|
Step 2: Create an ASYMMETRIC KEY in SQL Server
In the master database we need to create the asymmetric key from the file that was generated in Step 1. If you have not already created a master key for your SQL instance you will need to do that in this step.
USE MASTER GO -- Create the Master Key for the SQL Instance CREATE MASTER KEY ENCRYPTION BY PASSWORD = '[Some Really Strong Password]'; -- Create the asymmetric key from the strong named key used to sign the CLR project CREATE ASYMMETRIC KEY FirstSQLCLR FROM FILE = 'C:\Development\SQLCLR\FirstSQLCLR\FirstSQLCLR.snk' |
Step 3: Create a SQL Login based on the ASYMMETRIC KEY
In the master database we will need to create a SQL Login that we be generated from the asymmetric key from Step 2. This login will allow SQL Server to access the assembly and execute based on the permissions in step 4.
USE MASTER GO -- Create a login from the asymmetric key to access the CLR CREATE LOGIN FirstSQLCLR FROM ASYMMETRIC KEY FirstSQLCLR; |
Step 4: Grant Permissions to Assemblies using the SQL Login
In the master database we need to assign assembly permissions to the Login from Step 3. We are choosing UNSAFE because it give us the most flexibility, however depending on your needs you may want to choose SAFE or EXTERNAL ACCESS. See the CLR Integration Code Access Security for more details
USE MASTER GO -- Set the assembly permission level for the login GRANT UNSAFE ASSEMBLY TO FirstSQLCLR; |
Step 5: Sign the SQL CLR Project with the asymmetric key
Back in Visual Studio, we need to access the project properties. We will right click on the “FirstSQLCLR” project and select “Properties”. When the properties window opens, we will select the “SQL CLR” option. We will select “UNSAFE” as the Permission Level and then click on the “Signing” button. This will open the Signing dialog box. In this dialog box we will select the “Sign the assembly” checkbox, then using the drop down list we will browse for the asymmetric key created in Step 1.

|
Deploy the CLR Objects
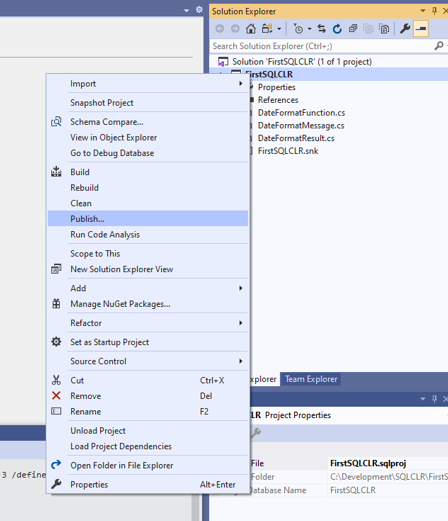
After the solution successfully compiles, the security has been configured both on the Database Project and SQL Instance, we are ready to deploy the solution to the SQL Server. To deploy the SQL CLR objects we will right click on the “FirstSQLCLR” project and select “Publish…”
|
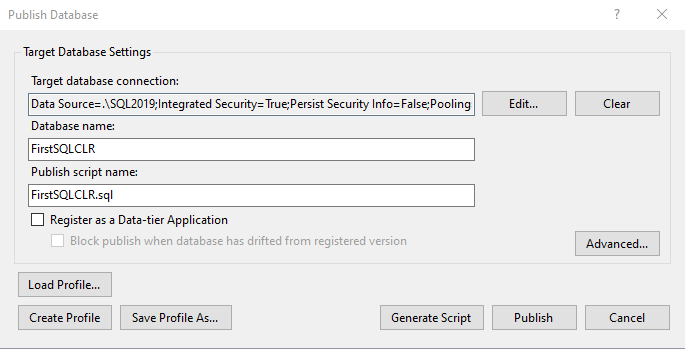
The Target Database Setting window will open. Here we will need to select the SQL instance and Database we want to deploy the SQL CLR object to. To configure the SQL Instance, select the “Edit…” button to complete the instance settings, specify the database name, and click on the “Publish” Button. We could script this out, however, that is a discussion for another day.
|
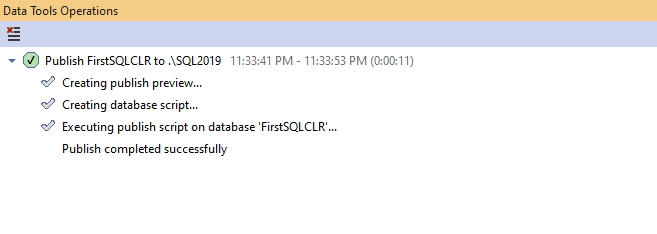
If the deployment was successful you will see a window like below.
|
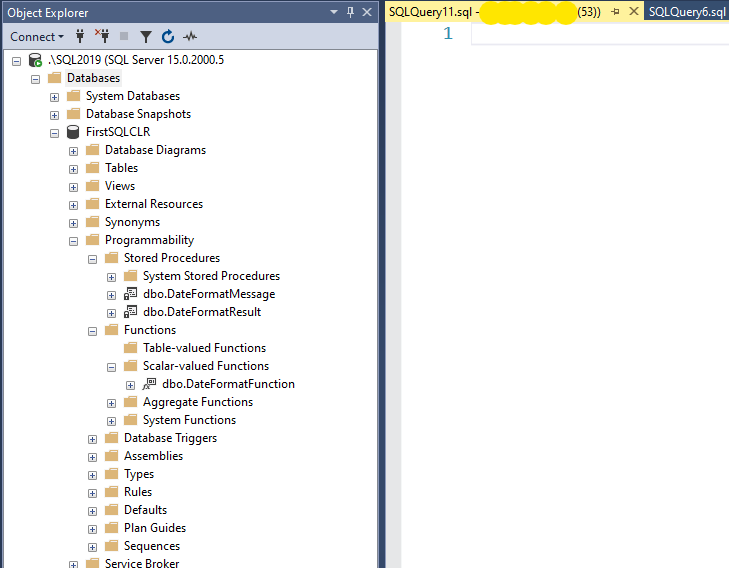
Moving over to the SQL Instance, if we refresh the database, we should now see the SQL CLR procedures and CLR function.
|
Execute the CLR Objects
Now that we have successfully deployed the SQL CLR Objects, we can try to execute them. Call a SQL CLR procedure looks very similar to a standard procedure in SQL Server. We will create variables for the date and format parameters and pass them to the procedure.
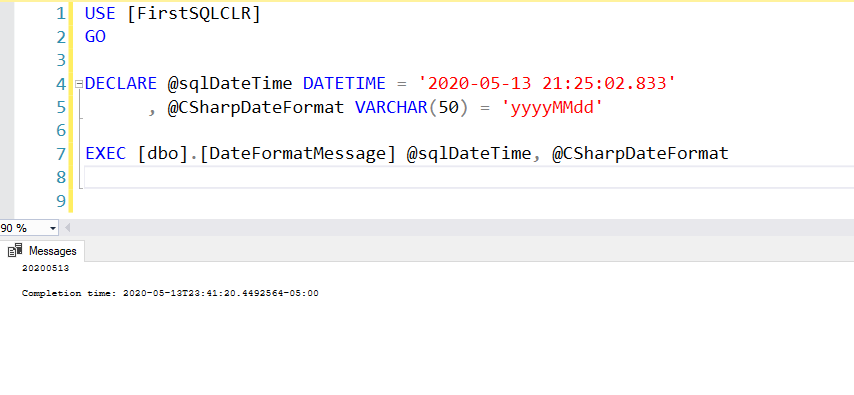
USE [FirstSQLCLR] GO DECLARE @sqlDateTime DATETIME = '2020-05-13 21:25:02.833' , @CSharpDateFormat VARCHAR(50) = 'yyyyMMdd' EXEC [dbo].[DateFormatMessage] @sqlDateTime, @CSharpDateFormat |
After we execute the procedure, we may see a message that looks like this: Msg 6263, Level 16, State 1, Line 7 Execution of user code in the .NET Framework is disabled. Enable “clr enabled” configuration option.
Here is a sample call.
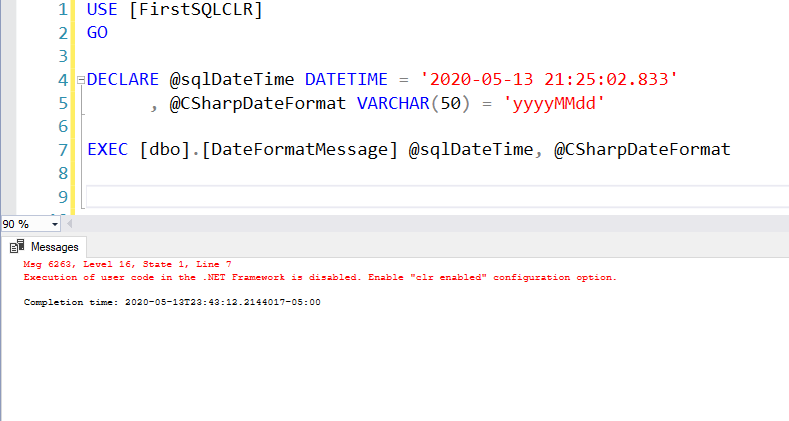
|
This error is because the current instance is not configured to allow SQL CLR objects from executing. We can turn this on with the following query to reconfigure the instance with the clr enabled flag.
EXEC sp_configure 'clr enabled', 1; RECONFIGURE; GO |
After we apply the configuration setting and try to execute the procedure again we should have a successful query call and see the following result. Here you can see the formatted date in the Message window.
|
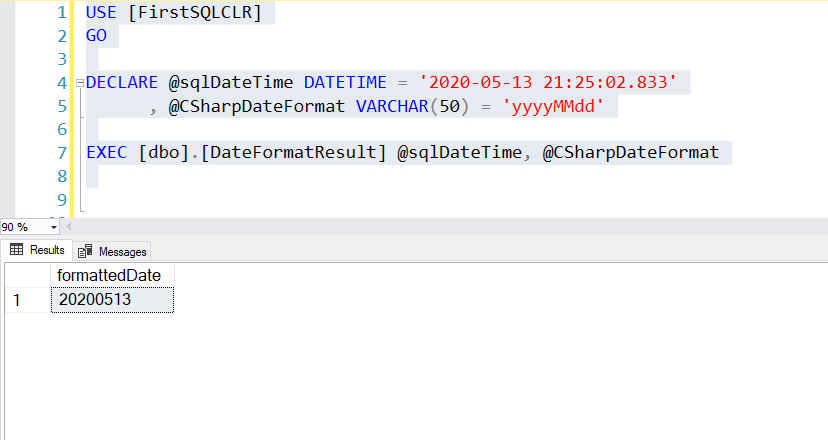
Let’s try running the other procedure DateFormatResults, notice that this time instead of the procedure returning a string value to the message window we see the data returned in the Results window. Here is the code to call the procedure and the results.
USE [FirstSQLCLR] GO DECLARE @sqlDateTime DATETIME = '2020-05-13 21:25:02.833' , @CSharpDateFormat VARCHAR(50) = 'yyyyMMdd' EXEC [dbo].[DateFormatResult] @sqlDateTime, @CSharpDateFormat |
|
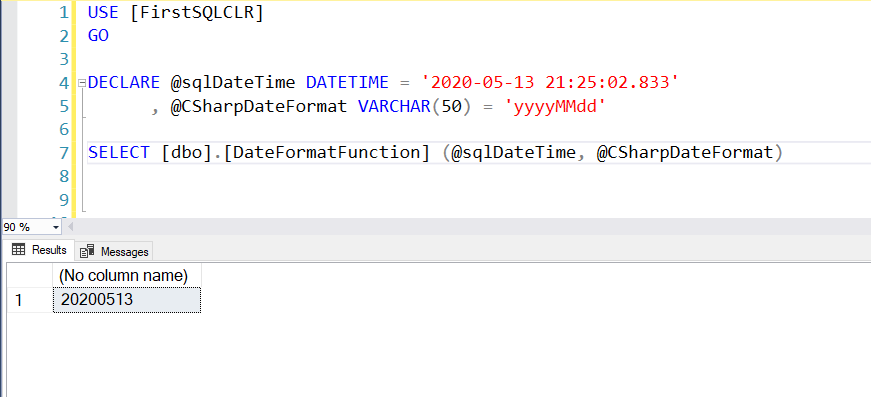
Finally let’s take a look at executing the SQL CLR Function DateFormatFunction. Again we call this the same as we would call a user defined function. This time we will call the function in a select statement and the result is returned in the Results window.
USE [FirstSQLCLR] GO DECLARE @sqlDateTime DATETIME = '2020-05-13 21:25:02.833' , @CSharpDateFormat VARCHAR(50) = 'yyyyMMdd' SELECT [dbo].[DateFormatFunction] (@sqlDateTime, @CSharpDateFormat) |
|
Summary
This was a “brief” introduction into creating SQL CLR objects from Visual Studio database projects. We took a look at the permission configuration with signing assemblies and creating asymmetric keys. In a future post we will look at creating another SQL CLR procedure where we read JSON objects. This will help show how to incorporate additional binaries into SQL Server. After that, we will finally get to the craziness with SQL Server, SSAS, CLR, JSON, and Visual Studio Database Projects.